Showing posts with label DIY. Show all posts

Monday, October 4, 2010

How to hem jeans

I found this link while attempting to do my first hem on a pair of jeans (on sale at Gap Maternity...8L... much too long).

How to Hem Jeans

I'm quoting the tutorial here as well...  This is an easy way to make a perfect hem... it looks great and the few mistakes I made were because I've only sewn like ten things in my entire life...

As follows...
"

beforejeans
I found this fabulously perfect way to hem jeans on the Cavaricci site, which has since been taken down, so here’s the lowdown. This method keeps the original hem in tact and is especially helpful now that all jeans are made to be 34 inches long for mammoth supermodels. Plus, it took less than 30 minutes.

A couple notes: It’s best to do one leg at a time, so as not to have too much undoing to do in case something goes awry. Also, it’s good to know the length that you want each leg to be. Sometimes, one leg will be a bit shorter or longer than the other before you hem.
Step 1: Decide how much length you would like to take off. Divide that number in half. (Hems should fall just below the bottom of your ankle. Also, if you generally wear high heels, or a certain height of heel, you might want your hem a bit longer – it should fall an inch to a half inch above the floor at your heel.)
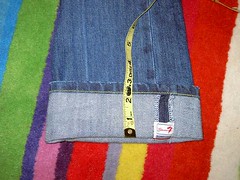
foldcuff
Step 2: Cuff the jeans. I wanted to take two inches off my hem, so I measured one inch out from the original hem line and pinned. (Do not include the distance from the hem to the end of the jean in your calculations.)
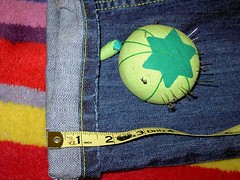
pin
Step 3: Pin around the rest of the cuff, taking care to measure each time you pin.
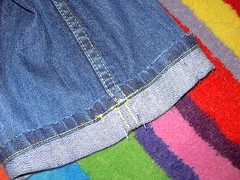
mindtheseams
Mind the seams while you’re pinning. Make sure that the stitching lines up at each seam.
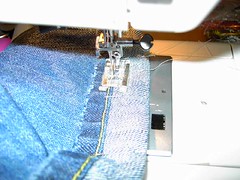
stitch
Step 4: It’s time to stitch. You want to place your needle and continue sewing right next to the original hem. Stitch on the right side of the hem, or the side farthest from the bottom of the jean. Sew all the way around the cuff. Be sure you don’t sew through both front and back sides of the jeans (making it so that the foot hole is sewn shut)!
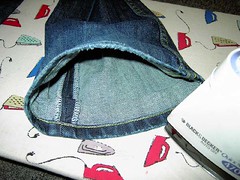
ironin
You can either cut the excess off, leaving about a half inch for fraying, or iron the extra material in.
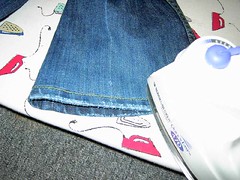
ironout
Turn the leg right side out and press the new seam flat, revealing the old hem.
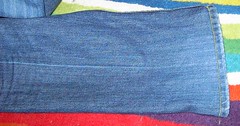
After Jeans
Voila! No more slouchy, unflattering leg.

Updates: I’m glad everyone has found this tutorial useful. I wanted to answer some questions here that continue to arise. If you are still having trouble, just leave a comment; I usually respond within a few days.
1) Yes, this trick works just as well with jean skirts, good point!
2) If you have already cut your hem off and still have it, no worries. You can still follow these directions. After you have decided on a length, do not divide in half as Step 1 suggests. Move on to Step 2. You will essentially be reattaching the original hem in this step. Pin the stiched line at your desired length (for instance, if you want your jeans to be 30 inches long, measure 30 inches from the inseam and pin the disconnected hem to that length on the jean leg, right sides together) and follow the steps from here. If you have already thrown away the hem I am sorry to say you’ll have to try and recreate the look from scratch.
3) If the jeans leg is flared, cut off the hem about an inch above the stitched hemline. Measure the circumference of the hem. Then, measure the circumference of the jean and the desired length you’re hemming it. Open the side seam of the jean several inches above where you want the jean to be hemmed. Take in the jean to the same circumference as the hem. You’ll want to make this look gradual. Reattach the hem portion following the directions in No. 2 above. I wouldn’t recommend using this method if the jean leg is more than an 1 1/2″ larger than the circumference of the hem.
4) This method can easily be done without a sewing machine. Follow the directions, just use your hands, needle, and thread.
5) If you are having trouble sewing over the seam with your machine, try a thicker needle. If this fails, you can always sew up to each side the seam (be sure to backstitch) and sew over the seam by hand. It works just as well. Also, a zipper foot may help.
6) I hang dry my jeans and tuck the excess fabric at the bottom up before hanging them, so I don’t need to iron the bottom flap each time. Alternatives to this, would be to use some Stichwitchery (a bonding, iron-on product) to adhere the excess material to the inside of the jean. Or, you could cut the excess off to 1/2 an inch and apply Fray-Chek a glue that keeps the material from unraveling.
Thanks for stopping by and happy hemming! -Dacia"

Monday, June 7, 2010

A love affair with babywearing....

I love wearing my baby...er...toddler. My hotsling served me well for the first 12 months (still does at times) and my Ergo is beyond a blessing. I LOVE LOVE them both. I have only ever taken the stroller out in town ONCE. Literally...I just never needed it. It was always a burden to think about dragging around a stroller when I can just pop him into my carrier and he's happy, I'm happy and we both look cute to boot. (Yes, thats something my mom says).


I've been thinking about the other types of slings, carriers that I want to try when #2 comes along (whenever that may be) and there are two types. A wrap and a ring sling. I bought a used Moby a while ago but Noah really hates it now that he is so big so no dice there. The ring sling I wanted originally was a Maya but I just couldn't justify the expense when I already owned a cute pouch carrier and an Ergo.


I just realized however, you can sew your own sling very easily. This is definitely going to become a project of mine once I get threading the bobbin down...heh. Check it out...
Bliss Tree: How to Sew Your Own Sling
The Baby Wear site also has a huge list of patterns.

Not the crafty type? Check out these beautiful slings on Etsy and support a WAHM!

For more info on "babywearing" and all the benefits check out Thebabywearer.com and Dr. Sears on Baby Wearing

Also, know that infants who are carried 3 extra hours a day cry and fuss 43% LESS than those who aren't worn. It makes sense, babies need and want to be held.  They also spend more time in a state of quiet alertness which is when babies learn the most. 

Carry your baby for a happier, smarter little pumpkin and enjoy every minute because before you know it, they are going to be 18 months old and running away from you!

Monday, May 24, 2010

Book Sling Materials: Check!

I've finally gotten ALL my book sling materials having just placed my order for THE most adorable fabric.

It literally took me 2 whole weeks to decide on fabric.

Drumroll please...............................

Book sling #1


Book sling #2

I LOVE it.

I wanted so many different things in this fabric that I had SUCH a hard time finding it.

I wanted it to incorporate the primary colors red and blue and yellow without looking like a 1st grade classroom.

I wanted it to be vintagey, maybe floraly, maybe boyish but also girlish just in case, and fun, and maybe "around the world" ish.

Check, check, check!!!!!!!!!!

Now to work this into the room somehow....


I am thinking maybe a quilt is in order....

Monday, May 17, 2010

Productivity... ahhh.

We had a gorgeous, productive weekend!!!

My mother, father and brother in law came up to visit and helped us accomplish SOO many things around the house. I appreciate it more than they know...  <3 Having three sets of hands around helps tremendously. Noah usually takes up most of my free time leaving other projects unfinished. (In this case, since November).

This is what we did.


Bryan and his dad and brother cleaned out one of the bedrooms on my mother's side of the house and it was a job, let me tell you. You could NOT walk into it. You could just open the door and peer in afraid....sweating a little bit.. Now, you can walk all the way through and there are TWO guest beds set up. The rest of the place is begging to be painted.

I'm going to help my mom paint it green (with the left over paint from our bedroom). We are going to then paint her Jenny Lind crib bright yellow as well. It's going to be adorable!! (See inspiration pic)

They moved the ginormous bed that was taking up most of Noah's playroom to that room (see pic where end of bed is). This freed up a TON of space and we were able to move the bookshelves from downstairs hall/office to his playroom.  (Notice the completed chalkboards!!)


THEN we painted most of what needed to be painted in the hall and stairwell. So everything is starting to get put together nicely and really feel comfy. 
Still some more painting to be done but we're almost finished!!

Now to get started on all my sewing projects!  I've got a bit to do before I'm totally done with his playroom...
~ hem curtains
~ reinforce shelving
~ add shelving to top of closet
~ create and apply fabric wall decals
~ buy and hang paper lanterns over stair well
~ hang chalkboards
~ finish book slings and hang
~recover rocking chair  (anyone with really good way to upholster a cane backed rocking chair WITHOUT removing the cane?)

They watched Noah for us this morning and we got to sleep in till 8:00. Isn't that the single most amazing thing you've ever heard!?! ALSO watched him while we to church at Burlington Vineyard so Bryan and I got to spend some time with each other. It was really nice.. <3

Tuesday, May 11, 2010

Happier Notes

On a happier note...

I've found a slew of creative blogs that I'm in love with and am officially motivated to start sewing!!

I've also got a list of projects to complete and completed a major trip to Lowe's to get supplies for some chalkboards and book slings I am going to make for Noah's playroom. Also, got some trim for the walls by the stairs and the rest of the paint so finally, this weekend, I am GOING to complete this stinkin project!!

I am so excited to do these projects and I wish I could take credit for them but I can't! haha. I'll blog about each one as I complete them but here is a list of links for your reading pleasuree..


The chalkboards aren't from a site. 
I just got some old wooden frames from Goodwill, took out the glass, etc and am going to repaint them bright, fun colors.
I bought plywood at Lowes and had them cut it to size for each frame. Now I need to prime and paint it with chalkboard paint and Viola! Adorable chalkboards for Noah to create little paintings in!! I'll put up a picture tutorial once they've been completed.

THIS site is incredible...her photography in and of itself is amazing. I would like to steal the lanterns/pompom idea and put in into blues/creams for his playroom....so adorable!!
I'd also like to make this pallet reading bed once we get into a bigger place.

And this site has an awesome tutorials list!!!
Toots!

Enjoy!